By Buvnesh
In case you were wondering, the answer to my last Quiz was
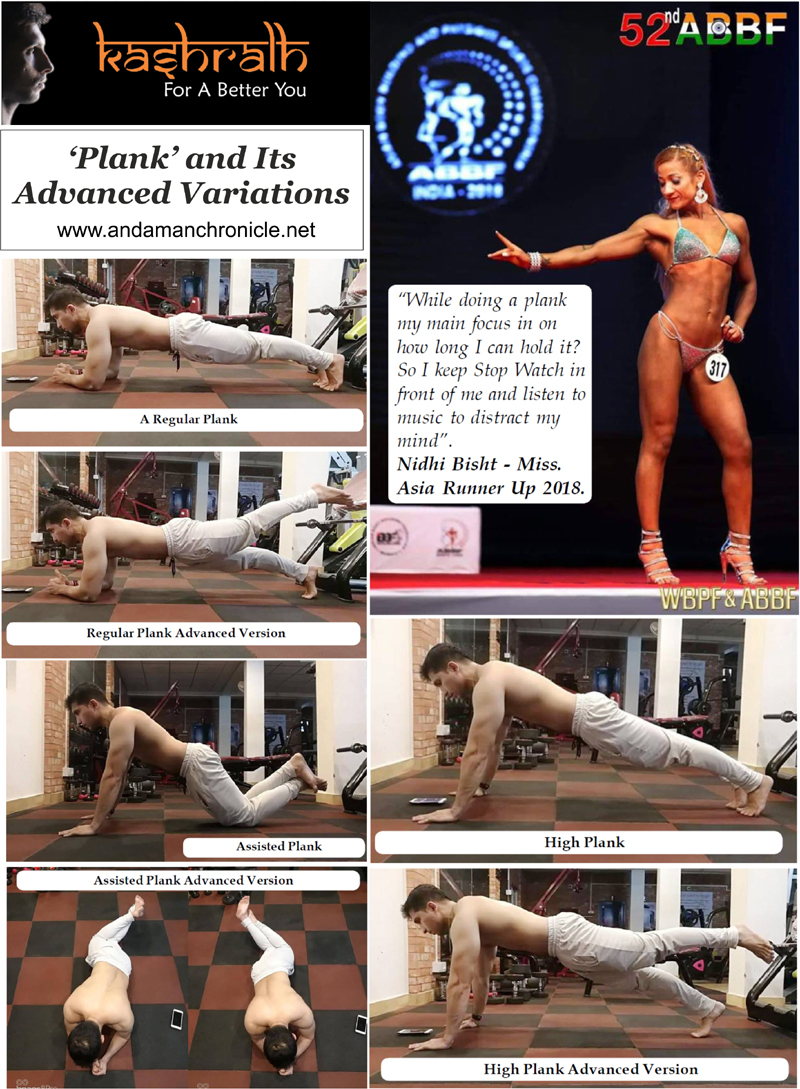
“A Plank”
A plank is an exercise where your body is stationary, but most of your muscle groups are under tension till you are holding the position.
What exactly is a plank?
A plank is a bodyweight isometric exercise that works on the core of one’s body.
This exercise works on the whole body and helps in toning and strengthening of various muscles.
As explained in the last article, Core is a series of muscle group that is spread throughout one’s body and helps in resisting any force, whether static or dynamic and to maintain a good posture. It improves stability of the pelvis and the spine.
There are a variety of options to choose from when it comes to planks. Each one of them is equally challenging as the other. Let’s start from the beginner’s version of a plank and build up to an intermediate level of plank.
In this article I’ll also be talking about advanced version of each plank.
So, let’s start with an Assisted Plank and it’s Advanced Variation.
How to perform an assisted plank:
The beginner’s version of a plank is called an assisted plank or ‘TYPE 1’ (for our reference) of a plank.
Now this is a great way to start planking for beginners and people who are on the heavier side.
How to perform a plank?
For TYPE 1 plank or an Assisted Plank follow the steps.
Step 1:
Lie flat on the floor with your foot close to each other, palms close/underneath your shoulders.
Your palms should be parallel to each other.
Step 2:
Push yourself up to a push-up position while your knees resting on the floor and help stabilize you.
Hold this position for as long as you can, and then repeat for another 2 sets for the first day and progress from there.
Fun Fact:
Staying on your knees during an assisted plank decreases the amount of load/pressure from your core muscles, but is as challenging as the other variations, and a great way to start planking.
Tip:
One thing I always do and recommend is to consciously suck your tummy in/tighten up your Abdominal muscles and breathe simultaneously.
Always focus on your breathing. May it be while on a plank or performing any exercises.
Advanced Version
Once you master an assisted plank, try to twist/roll your hips from left to right while you hold the posture. This is a great way to add that extra pressure and increase the intensity of your exercise.
TYPE 2 or High plank
This is an intermediate exercise.
A high plank is not only a great exercise for your core, but has an added benefit of improving your shoulder health, shoulder stability; as you are holding yourself up using your arms and shoulders.
To perform a high plank,
Step 1:
Lie flat on the floor with your foot close to each other and palms close/underneath your shoulders.
Your palms should be parallel to each other.
Step 2:
Push yourself up to a push-up position and hold for as long as you can. Keep your feet flexed with the bottoms of your toes on the floor.
Again, tighten up your Abdominal Muscles and keep breathing (extremely important).
Advanced Version
Once you are able to hold a High Plank for a good amount of time, say above 2-minutes; try this:
Raise any one of your leg from the ground to your hip level and try to hold that position for as long as you can and once it starts getting tired, switch legs.
This is again to increase the intensity of the exercise and feel that pressure build up on your Core.
The key difference between a High Plank and an Assisted Plank is that:
In a high plank, your toes and arms help you maintain the position of the exercise, which makes a High Plank a tad bit difficult to maintain for a longer period of time.
While on an Assisted Plank your knees assists you to manage your bodyweight throughout the course of time you try to maintain it. It’s still an effective and a great way to build your way to a stronger Core.
TYPE 3: A Low Plank
A Low Plank is a modified version of a High Plank but in this exercise you rest on your forearms parallel to each other as compared to your arms on a high plank.
To perform this exercise
Step 1:
Step down to your knees and kneel on the floor.
Step 2:
Bend down and place your forearms on the ground.
Now, you can either choose to make a fist of your palms or place them flat on the ground.
Step 3:
Push yourself up using your toes and balance your body along with your forearms. Keep your feet flexed with the bottoms of your toes on the floor.
Advanced Version
Once you can hold this position for more than 2 minutes or above you can try the above stated advanced techniques to increase the intensity of the exercise. Another great way to increase the intensity of the exercise is by elevating your upper body.
To do so, you can use a gym/stability ball if you have access to a good gym or even a chair should do the trick.
My Tips:
While breathing is one of the many important things that I always recommend you to concentrate on, there are certain other rules that I abide by such as:
- Always maintain a straight position from head to heels because a good posture is always appreciated and helps you target the right muscles rather than to create extra pressure/compression.
- Look towards the floor always, this maintains a neutral position for your neck and avoids unnecessary compression of the joints.
- Keep your toes as firm as you can on the floor and flexed throughout the exercise. This ensures that you don’t slip while doing a plank.
- While holding a plank, your main focus should be on how long you can hold it and progress with every set you do.
“While doing a plank my main focus in on how long I can hold it? So I keep Stop Watch in front of me and listen to music to distract my mind”, says Nidhi Bisht - Miss. Asia Runner Up 2018.
Quiz Time:
Think you know all about planks?
Answer a simple question to test your knowledge.
Throughout the past two articles I tried to share as much as I can about Planks. The muscles involved, exercises and also how to do the Beginners and Advanced Versions of planks.
Now answer this: Which muscle is not worked while holding a plank position?
Comment down below with your best answer and stand a chance to win a free workout at
“Kashrath- For A Better You”.
Until then …
Keep Grinding!
For queries and suggestions, please feel free to mail me at This email address is being protected from spambots. You need JavaScript enabled to view it.